4 comments

A quick update on this blog, I will be traveling for my job in the coming week for a few weeks and will most likely not have time to post anything. I will try to keep this blog updated as best I can in the next few weeks, but no promises. Once I get back I will continue on with my postings. Now on with this post ...

In many WPF applications one will come across animations in some sort of fashion. This post is geared towards moving an object on the screen; particularly moving it along the x-axis. I will cover 2 ways of achieving this and both are very rudimentary. The first, setting the Canvas.SetLeft attached property and the second sets the TranslateTransform.X property.

PerformanceTest_App_SimpleObj

The application that I wrote compares 2 different objects being moved by the 2 above mentioned properties. The first object is a simple Rectangle from the System.Windows.Shapes namespace. The other object is just a Button from the System.Windows.Controls namespace. The button is our semi-complex object for 2 main reasons. One, it derives from UIElement and the other is that our button has its template overridden to provide a better looking button. Besides the properties that we are comparing under this performance test (Canvas.SetLeft and TranslateTransform.X), the rectangle has a couple of properties set on it; Canvas.SetTop, width, height and fill. The Button also has some properties set on it; Canvas.SetTop, width, height and style.

PerformanceApp_App_SemiComplexObj

The performance tool that I have used is called WPFPerf which comes with the Windows SDK, but you can download this tool and the whole WPF performance suite here: http://wpf.netfx3.com/files/folders/developer/entry10880.aspx The only real measurement that I was looking for was the frame rate. The higher the number of frames the smoother the animation.

Below are what my 2 objects look like and their performance tables as well. The tables display the number of objects that were created, the frame rate for setting the Canvas.SetLeft property and the frame rate for setting the TranslateTransform.X property. The program simply loops a number of times to create a different number of objects (as stated in the tables below). A DispatcherTimer is used to increment the objects' Canvas.SetLeft / TranslateTransform.X property. This provides our relative smooth animation for the object. One point of note here, I increment the Canvas.SetTop property by only 1 each time (even though the height of my objects are 25 so overlapping occurs). This is to force WPF to draw all of the objects that are on the screen since my resolution is 1920x1200; 1000 objects shifted by 1 will allow me to see all of them.

simpleObjSimple object (System.Windows.Shapes), Rectangle:

# of Rectangle Objects

Canvas.SetLeft

Frame Rate

TranslateTransform.X

Frame Rate

1000

64

63

2000

55

51

3000

38

25

5000

25

24

10000

13

11


semiComplexObj Semi-complex object (System.Windows.Controls), Button:

# of Button Objects

Canvas.SetLeft

Frame Rate

TranslateTransform.X

Frame Rate

10

63

62

25

54

53

50

27

26

100

13

13

1000

1

1


As you can see from the 2 tables, the clear winner is moving a simple object around. I won't go into the details on why this is, but the majority of it has to do with the Button deriving from UIElement. There is a lot of overhead that the object automatically receives which one may or may not want.  But the real focus of this test was to compare the Canvas.SetLeft property vs. the TranslateTransform.X property. Starting with the simple object, the 2 properties start to diverge around 3000 objects. With the semi-complex object the 2 properties really never differ. This is good news, all though this test may not be the best one for all applications, it certainly suites mine! And yes, the duck graphic is form duck hunt (that I have vectorized) and if you have been following along with my other posts you surely can put 2 and 2 together to see where this is going, hopefully soon.

In conclusion, Canvas.SetLeft vs. TranslateTransform.X properties perform very similar and is personal preference for choosing. Of course, if your application is using an absolute positioning system the Canvas.SetLeft property will be more suitable for you.


filefile size
PerformanceTest SetLeft vs Transform.zip8.83 KB

0 comments

ok, so you don't need any WPF at all to actually control you computer using a wiimote, but everyone loves the simplicity of making and controlling a gui with WPF that we should use it anyway's! Plus, WPF is just cool. Anyway, using Brian Peek's Managed Library for the Wiimote (I used version 1.2.0.0) you can receive data from the wiimote about its IR coordinates (up to all 4 IR sensors now!) and all of its button states. Since we can receive the wiimotes IR coordinates, we can tell our application to point the mouse cursor to those coordinates. It's that easy!

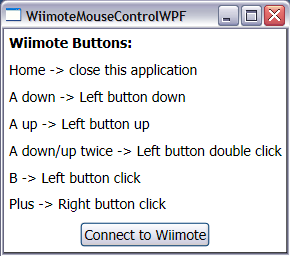
WiimoteMouseControlWPF_App 

But of course things are not always that easy all the time. With WPF and its new System.Windows.Input namespace, Microsoft introduces a new way to control input devices such as the mouse. I did some basic research (and maybe not enough) and found out that there is no easy way to tell the mouse cursor where to point to in WPF. With winforms you could say:

Cursor.Position = new Point(50, 50);

and that would set the cursor to a point at 50 pixels from the left and 50 pixels from the top, with 0,0 being at the upper-left of the screen. So after finding no easy way to do this in WPF I decided to use this winforms method instead. I used the midpoint of 2 IR sensors (version 1.2.0.0 only received data from 2 IR sensors) and set the position of the cursor to that point. This allows me to move my wiimote and the cursor moves as well!

I then added some simple functionality to mimic a mouse using the wiimote. This was much more difficult than I had anticipated; I had to use some Win32 api calls. I mainly used SendInput() that allowed me to send mouse events to the computer. The different mouse events that I used were:

  • Left button down
  • Left button up
  • Right button down
  • Right button up

These events allowed me to simulate a click event for the left click and for the right click. However, there is a small bug. When clicking (left or right click) on a menu and then moving the mouse over a submenu item seems to actually select the that item. If I get that interested in this bug I will try to fix it, however there are other projects that I would like to start up. Also of note, I found these Win32 api calls from a forum. The wiimote buttons that map to the mouse are as follows:

  • Home -> closes the application
  • A button (down) -> Left button down
  • A button (up) -> Left button up
  • A button twice consecutive -> Left button double click
  • B -> Left button click
  • Plus -> Right button click

Upon receiving updated data from the wiimote I use simple setters to set my boolean properties that in turn cause the cursor to update its position or send a Win32 call for a mouse event. There could have been better approaches (data binding?) than this implementation, but this was the simplest way for me to code; yes I was a bit lazy this time ;)

WiimoteMouseControlWPF_TrayIcon

One other thing I have added to this application is that when you minimize it, it goes into the taskbar as an icon. This way you can run the application and minimize it out of the way while you control you computer! Enjoy this application and let me know what other buttons / controls you would like me to add. If I get some responses I will look into adding those features.

filefile size
WiimoteMouseControl Source.zip21.61 KB
WiimoteMouseControl App.zip17.35 KB

2 comments

I'm sure almost everyone knows about the Nintendo wii. It uses a different type of controller that is a real ingenious piece of equipment. The controller is the wiimote that has some awesome sensors in it. Much more detailed information can be found at the WiiLi Wiki. There are links that describe what type of sensors the wiimote has and how it works. There are also links that describe the data the the wiimote passes to the wii.

Now that's one cool input device if you ask me, but what does this wiimote do for us? Well, since it is a bluetooth device you can connect this guy to you computer pretty easily; all you need is a bluetooth adapter or built in bluetooth on your computer. Once connected you can use some programming language to interrupt the data that the wiimote sends to the computer. Brian Peek has written a nifty managed library for the wiimote that I have used (at the time of writing this I am using version 1.2.0.0). He also lists other projects that are using his library; some really cool ones at that. And of course, the guy who has started this phenomenon is Johnny Chung! Thanks to everyone for putting together their projects so I could learn and finally create one of my own ... and yes, there will be more to come.

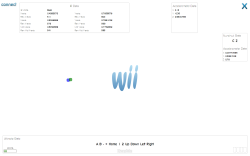
WiimoteWPF_ScreenShot_Thumb

So for this first part in my wiimote application, I have built a wiimote status app using wpf. My application lets the user connect to the wiimote and it displays a lot of data that the wiimote is telling the computer; mainly its IR coordinates, accelerometer data, button states and extension status. You can also use my application to toggle the LED's and the rumble feature on the wiimote. To get valid IR coordinates (and some round circles to move on the application) you need to point the wiimote at some IR light source. Incandescent light bulbs will work as well, or even the actual wiimote sensor bar! Speaking of the sensor bar, I built my own version using some IR LED's similar to this one. However, there were some difficulties in putting the final product into the casing I had and in the end I broke an LED, so my homemade sensor bar is sitting in a bad currently.

Hopefully you will enjoy this project and all that it has to offer. It really was a good introductory to learning how to use the managed library and to better understand the wiimote. I know there has been talk about tracking multiple points using the wiimote and Matthias Shapiro is currently looking into this using wpf as well. Check out his wii data visualizer, he has some great ideas on how to show some of the wii data!

There seems to be plenty of people out there that are starting to use the wiimote as a great input device. If you have any questions or thoughts about what projects I should try to accomplish, let me know. And let me know what you think about my application as well!

filefile size
WiimoteWPF Source.zip110.1 KB

5 comments
  •   posted in: 
  • WPF

Every WPF developer should come across these three tools at some point in their career. These tools are extremely valuable for debugging, developing, cleaning and optimizing WPF applications. I can't believe how many months I went without using these tools to their full abilities, but now I use them on a daily basis. Below is a brief description of each tool along with links to where you can download them.

Pistachio

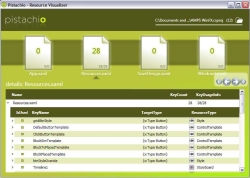
pistachio

A WPF resource visualizer that allows you to open a project file (.csproj) and view all of the resources that you are using. It points out what files are using a particular resource and what line number it is on ... however it doesn't 'open' that file when the user clicks on the name of the file, even though a hyperlink-looking file name tells the user differently ... maybe this is something that will come out in a future update??? But nonetheless this is a great utility that one can step back from the inner workings of the project and see where all of your resources that you are using really live. I know I have cleaned up many resource files and in doing so improved the overall performance of my WPF apps. It also has some slick animations with their carousel and the design / colors of it are superb! Here's the site where you can download Pistachio:

http://www.granthinkson.com/2007/11/08/announcing-pistachio-wpf-resource-visualizer

and here's a direct link to the download:

http://www.granthinkson.com/wp-content/uploads/2007/11/pistachio.zip


Snoop

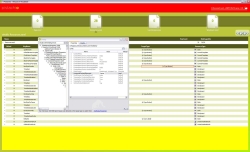
By far my favorite tool when debugging WPF apps, especially at a visual level, Snoop provides such a quick and efficient way to visually inspect my applications. Just run the .exe and tell snoop which WPF application to insepct. A window will pop up that stays on top of your application at all times (you can minimize it) and displays the visual tree on the left side (with the name of your elements, their type and how many children they contain) along with all of the properties and events on the right side. The properties tab shows all of the properties names, values and values' source of the selected visual item from the visual tree. Here you can inspect what values are on certain properties of particular elements and then change that value and watch as it changes in your application instantaneously!!! This is such a cool feature, and the change is persisted throughout the entire lifespan that your application is running as long as snoop is running. This is a great feature for changing colors, visibilities, sizes and many many other properties. You can also search for properties and even hold down ctrl-shift and mouse-over your application to instantly view what the visual element is. One note about the ctrl-shift is that snoop digs down into templates and usually down a layer or two more than what you are expecting, but that's a good thing, right? Of course it is, you can see what template that the visual element is receiving and if any of those values are being trumped by any local values.

Snoop also provides a nifty way to inspect visual data binding errors. In the upper left corner there is a drop down box that you can open and select 'Visuals with binding Errors' to see a list of visual data binding errors that your application has. This is a great tool to try to figure out why some binding expression may not be working. You can then select the property on the right side of the application and right-click to delve into the binding or binding expression for finer detail of the error. Also, when a property value changes the whole property's background changes to yellow for a second to grab the users attention.

snoop

One last nifty feature is that snoop allows you to view a list of events that you specify that occur in your application. You can see what elements are affected when you click on them and see who handles that click (if anyone) as well. Handled events are displayed in green. This is a great way to see the difference between tunneling and bubbling events and how they can affect your visual elements if they are handled too soon or not at all.

Here is the direct link and prettier pictures / more in depth on snoop's features:

http://blois.us/Snoop/

However, snoop comes with full source and you must compile it first to use it. For the weary of heart you can download the compiled version with a little extra (an actual snoop icon!) at the bottom of the page. For some reason snoop never had an icon so I made one and used it in the project. The icon is also available for you to download.


Mole

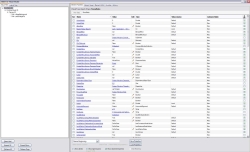
Mole is the only evolving visualizer that I know of at this time. It looks very promising so far and will only get better. Mole has taken what snoop has to offer and gone beyond my expectations, with each new release surprising me even more. My only complaint about mole (and I understand that mole is a debugger visualizer) is that I can't use it how I can use snoop; a free standing application. You start mole from inside visual studio while at a breakpoint by clicking on the magnifying glass and selecting mole from your list of visual debuggers. That said, mole is worth the download and then some.

mole

Mole offers the visual tree and the logical tree on the left much like snoop with a list of properties on the right. Mole offers a little more detail about the properties with more options to view certain groups that may interest you. You can also edit a property's value and have it be preserved throughout the applications life! You can look at a visual of that element, XAML code for that element (even if that visual was written in code), mark favorites and compare properties to each other from different runs of the program by saving the list of properties to an xml file.

Here is the codeproject site where you can download mole from; it continues to evolve so be sure to check back there for the latest!


If you have any other great WPF tools or just want to share your thoughts please do!

filefile size
Snoop.zip61.73 KB
Snoop.ico3.55 KB

0 comments
  •   posted in: 
  • WPF

If your just interested on the post topic feel free to skip this paragraph; just me talking about the past 3 months and what has been going on in my life. 3 months since my last post .... wow, life sure has been crazy. Not only with the holidays being crazy as usual, I also got married and went on my honeymoon!!! All of my tasks for the wedding just seemed to hit all at once and things got crazy from then on, until the wedding day of course. Everything went very well on my wedding day, the limo was a 67' Rolls Royce and the food at the reception was absolutely amazing, well what little I had! Then it was off the Maui, Hawaii where my wife and I stayed for a week and a half. It was gorgeous, too pretty for pictures to describe (and yes, there are many many pictures, over 12 GB worth!!!). My wife is a photographer and so she was prepared ;)  I took some pictures too, and one of them is on our wall in our living room, go me! But alas the good times were interrupted by the worst storm since 1980 ... rain rain rain. It made the water all muddy with debris everywhere, flash floods, and 100+ mph wind gusts! Luckily Maui is extremely small (70 miles wide) and we were able to drive through the storm to the other side of the island and find some sunshine, some days. Even though 7 out of the 9 days were filled with rain, we found time to enjoy Maui to its fullest. I would especially recommend Mama's Fish house, a little pricey (like all other restaurants on the island) but they had the best food of all; try the parmesan crusted, crab and lobster filled Mahi Mahi, the best fish I have ever had! Then the honeymoon was over and the holidays upon us. Of course we had to catch back up with work and then off for the holidays and then back to work so my time has been busy. Oh, and you think taking time off from work would provide me with some time to blog / code, not really ... the Mrs. had other plans, more housework! But now things have settled down some and I am starting to get back into the groove of things at home and at work. So stay tuned for more posts, I have about 3 more ideas I want to blog about already! And now onto the snowflakes!

snowflakepic1

Above is a picture of the snowflake picture project. I have provided full source as well as just the executable for all interested. Let me first say that the code was written purely for my rehearsal dinner slide show and thus it is not formatted or commented as well as it should be. But it does work and provide another alternative way to think about a slide show presentation that can be created quickly.

The program looks for all .jpg files in your MyPictures directory and all of its subdirectories. It then makes a vector snowflake outline and paints the image onto its background. There is simple, very simply math that moves the snowflakes from the top to the bottom of the screen and sways them back and forth. I did not have much time to write a better algorithm for animating the falling and swaying of the snowflakes, feel free to write a better one and share it! Here's the gist of the algorithm:

- get the total height of the screen and apply a translate transform to each snowflake on its y-axis. Each transform has a random number assigned to it for the time interval to fall, this number is constrained by minimum and maximum bounds. Once the snowflake passes the bottom of the screen, clear its transform and apply another. Repeat indefinitely.

- each snowflake also has an x-axis translate transform applied to it that uses two random numbers to move it some delta over some random time.

Now this algorithm is by far simple and it shows when you run the application from time to time. If the random numbers are all very close (maybe I am using the random class wrong) then the snowflakes bunch up. Also, all of the snowflakes start at a similar position and are not offset by much.

The program also enlarges and centers (on the y-axis) 1 snowflake at a time throughout the life of the program. This is to give that full screen picture effect so you can view the whole picture better. When the snowflake is enlarging the vector graphic that holds the image changes to open the center up some and all you to view most of the image. There is another xaml graphic in the solution that allows for a closed center for the enlarged snowflake; these are found in 'Snowflake.xaml'.

Feel free to change the code, use your own falling algorithm, your own graphics and make any changes you would like. If you do make some cool changes please share them! I had another version that I did not include due to space issues, that had music throughout the programs life and overlay text in the beginning for some description about the presentation.

To close the program, mouse over the upper right for 'close' to appear and click on it. Enjoy!

filefile size
SnowflakesSource.zip558.38 KB
Snowflakes.zip554.61 KB