Silverlight and Drupal: Popular Content
- posted in:
- Drupal
- Silverlight
The next item in this series is the drupal popular content block. You can see this block on the right hand side titled 'Popular content' that lists my sites popular content of all time. The current block actually uses the views (version 2) module to display the content, but this information ultimately comes from drupals core statistics module. The information will be hosted in a custom silverlight control that I have created that simply sends requests to my custom drupal module and displays the data that it receives. I have broken down each part into their own section.
Drupal Part:
The drupal side of things uses the same method that I described in my first 2 posts of this series, Connecting Drupal and Silverlight, Silverlight and Drupal: Syndication for requesting data where I map my XML-RPC methods to callback functions that send the appropriate data to my silverlight control. Drupals poplar content block has 3 pieces of popular content that I was interested in receiving data from:
- Today's popular content
- Last viewed content
- All time popular content
Each of these will display a number of entries (determined by a number passed into these functions) that show their corresponding results. For example, if you request data from the all time popular content and wish to see only 3 entries, you will receive back the 3 nodes that have been viewed the most since you began your site (or since you enabled the statistics module). The data that comes back is HTML code for easy layout of links that point to these popular nodes.
For my silverlight control I needed the exact information that this module was passing back to me but in another form (to make my life easier on the silverlight side). Of course, I could use the HTML code that I was receiving, parse it correctly and end up with the same result, but I wanted to tinker with php some more. I decided to look into what the statistics module was calling using the drupal api so I could tweak those calls in my custom drupal module. The section of code in the statistic module that I was interested in is below:
$alltimetop = variable_get('statistics_block_top_all_num', 0);
if ($alltimetop && ($result = statistics_title_list('totalcount', $alltimetop)) && ($node_title_list = node_title_list($result, t('All time:'))))
   {
     $content[] = $node_title_list;
   }
This returns the well formatted HTML code that I was just describing for the all time popular content. The other 2 types of popular content (today and last viewed) have the same implementation with different variables. To alter this code some, I dove into the 'node_title_list' method and saw that this method takes in the results from the 'statistics_title_list' method and grabs out the nodes properties and then formats the string into a block of HTML so the popular content block can be easily rendered. For my silverlight control I only needed the title of the popular content and a link to that node so I changed the php to the following:
$titles = array();
$urls = array();
$result = statistics_title_list('totalcount', $numContent);

while ($node = db_fetch_object($result))

 {
   $titles[] =  $node->title;
   $urls[] = check_url(url('node/'. $node->nid));
  }

return array('popularContentAllTimeDone', implode("~", $titles), implode("~", $urls));
I simple call the 'statistics_title_list' method that will return all of the nodes that I request ($numContent) that are in the all time popular content row in the database. I then go through each node pulling off the the title and converting that nodes nid to a valid url. I then implode each result with a special character (~) and return the method that my silverlight control will call, the titles object and the urls object. I used the implode method for easier separation of the strings that my silverlight control will receive.
Silverlight Part:
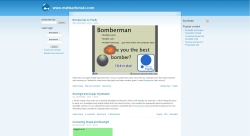
Now that we know how the data will be received in our silverlight control (and we already know how we will request data from my first post, Connecting Drupal and Silverlight) we can lay out our design. I wanted to replicate what my site already has (picture at the top-right of this post) where the popular content displays a list of hyperlinks. Ah, a list! We will use a ListBox and customize each item to look like hyperlinks and even provide an event that will take us to that node when it is selected. For each type of popular content that we will viewing, I have chosen to make 3 listboxes and have them act the same way, just request different data.
The listbox control contains a collection of items and by default displays these items in a vertical fashion (This can be changed be changing the ItemsPanel of the listbox). One great thing about the listbox is that you can bind its collection! And this is precisely what we will be doing. I set the ItemsSource={Bidning} on my listbox and this allows me to programmatically set the listboxes DataContext property in code when I receive the data I want to bind to.
I have 3 dictionaries that map a uri to a string that is populated from the data that my custom drupal module sends me. I bind my listboxes to these dictionaries, respectively and thats it, those listboxes are fully populated! Wait .... it doesn't look right, well yea, it displays 'Collection ...' instead of the node titles that we want to link to. Since the listbox, by default displays each of its items' ToString() method we get the 'Collection ...' string. We need to edit the ItemContainerStyle of the listbox so we can tell what each of its items should look like! We simply want each item to display the title that we received from drupal. This can be done with the following code (omitting my visual state groups):
<Style x:Key="styleItemContainer" TargetType="ListBoxItem">
  <Setter Property="HorizontalAlignment" Value="Left" />
  <Setter Property="Template">
    <Setter.Value>
      <ControlTemplate TargetType="ListBoxItem">
        <Grid>
          <Grid.ColumnDefinitions>
            <ColumnDefinition Width="0.1*"/>
            <ColumnDefinition/>
          </Grid.ColumnDefinitions>

          <!-- Circle drawing -->
          <Ellipse Width="6" Height="6" Fill="#FFE8E8E8" Stroke="#FFB5B6B6" Grid.Column="0" VerticalAlignment="Top" HorizontalAlignment="Center"/>

          <!-- Text with underline -->
          <Grid Margin="4" Grid.Column="1" HorizontalAlignment="Left">
            <Rectangle x:Name="rectangleUnderline" Stroke="#FF0062A0" Width="{TemplateBinding Width}" Height="1" RadiusX="2" RadiusY="2" VerticalAlignment="Bottom" Visibility="Collapsed" />
            <TextBlock x:Name="textBlock" Text="{Binding Key}" Foreground="#FF367ACF" />
          </Grid>
        </Grid>
      </ControlTemplate>
    </Setter.Value>
  </Setter>
</Style>
The first thing to note is the TargetType="ListBoxItem" on the style. This tells us that the style we are applying to the listboxes' ItemsContainerStyle will directly affect its items. The next thing to note is that the TextBlock has its Text property set to {Binding Key}. What does this mean? This is telling us that the text that will be displayed for each ListBoxItem is bound to some property Key. This Key property is actually the Key in our KeyValuePair Dictionary which is bound to our listboxes ItemsSource property. So for each item our listbox it will know to display the title of each node that is returned. Databinding sure is sweet!
Ok, so now our listboxes display the correct data that we want them to. All that is left is to plumb in some event that will navigate to those nodes when those items are selected. Databinding to the rescue once again! In the drupal part of this post we were returning not only the titles of each node but also the links that will take us there. This is part of the Dictionary that we set up and our listboxes are already databound to these Dictionaries, so were done! Well, just need to plumb in the event that will pull the link out of the dictionary and navigate to that page. Listbox has a 'SelectionChanged' event that will be raised whenever the selection is changed, which is perfect!
private void listBoxToday_SelectionChanged(object sender, SelectionChangedEventArgs e)
{
   Uri link = ((KeyValuePair<string, Uri>)((sender as ListBox).SelectedItem)).Value;
   HtmlPage.Window.Navigate(link);
}
The selectionChanged event grabs the listboxes selected item (which is a KeyValuePair) and pulls out the value which is our url. Then we tell the window to navigate to that link. It's that simple.
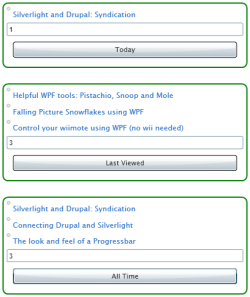
After a little styling and correctly positioning elements, here is the final result. This control allows the user to enter a number that will be returned for each poplar content. The number must be greater than 0 or else our module will return an empty string and all that will be displayed is a tiny circle (leftover residue from our item template).
There is only 1 webClient that is being used for this control, so you must wait until the request is done processing before you make another request. Go and try the control out, it's at the top of this post and feel free to change the number for each request. One tip, press the 'Last Viewed' button, then navigate to different pages on my site and press that button again!
The source code is provided along with my custom drupal module. Remember to set the html page as the startup project if you download the source and decide to play with it.
| file | file size |
|---|---|
| SLDrupal - Popular Content.rar | 215.47 KB |
| popularContentmodule.txt | 2.27 KB |

