Background Overlay with Opacity
- posted in:
- WPF
Ever use the opacity property to give some element a see-through effect? It's pretty cool the results you can get, but you can also run into some problems. For instance, you have some container of elements and you want to give that containers background a see-through effect. So apply an opacity of 0.50 to the container and your done! Well, not so fast. Once you do this all of the containers children will also get this effect and thus everything looks to be faded out, as shown below:

Well that's not what we wanted, we just wanted the background to be faded. Well there's a couple of things you could do to solve this problem. One, you could use blend to make a semi-transparent background and just use that brush as the background, but this could be time consuming and is not a general rule of practice to accomplish this effect. Another way, the way I prefer (unless you can convince me otherwise) is to overlay 2 elements on top of each other and give the bottom one the faded look. This way, the top element (and all of its children) will retain their full transparency and not be faded; of course you can fade these elements as well and get a multi-level look and feel of the faded elements.
So how do you overlay one element on another and give the bottom one the faded look? Well this is one way that I have found to be fast and efficient. Place the 2 main parent elements in a grid so that they overlap one another.
<Grid/>
Make sure you place the element that you want to be faded on the bottom by adding that element to the grid first; in XAML just place this element in the grid first. Then give that first element an opacity of something between 0 and 1. 0 means that the element is completely see through and therefore not visually seen (but still hit testable!) and 1 means the element is in full color! Also, be sure to give that first element some sort of fill / background that fills up the entire area that you want to give the faded look to. Your good to go now!
But if you want some extra help and an example keep reading. What I prefer to use as my bottom element is a Rectangle. This is a light-weight shape (shapes are not all that great sometimes, more to come soon on that topic) that gets the job done. You could have just as easy used a Border or some other light-weight element. The trick with using one of these elements that do not automatically fill up its parent (the grid) is to set its width and height to its parent width and height. Now you could hardcode these values in, but that is a big no-no if you ever want to make you application modular. Plus, its much easier to to have things grow / shrink according to the users preference and how they like to use / view the application.
So the trick is to bind the rectangles (or whatever else you are using as the bottom element in the grid) width and height to the parents width and height (which is the grids width and height). You can accomplish this with the following example:
<Rectangle Width="{Binding RelativeSource={RelativeSource Self}, Path=Parent.ActualWidth}"
Height="{Binding RelativeSource={RelativeSource Self}, Path=Parent.ActualHeight}"
Fill="Gray" Opacity="0.65" />
Shown below are the 2 code snippets that have been combined to produce the overall effect we were going for:
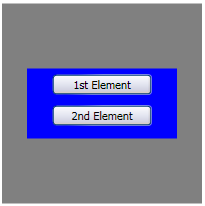
<Grid Width="200" Height="200">
<Rectangle Width="{Binding RelativeSource={RelativeSource Self}, Path=Parent.ActualWidth}"
Height="{Binding RelativeSource={RelativeSource Self}, Path=Parent.ActualHeight}"
Fill="Black" Opacity="0.5" />
<StackPanel Background="Blue" Width="150" Height="70">
<Button Width="100" Content="1st Element" Margin="0,5,0,5" />
<Button Width="100" Content="2nd Element" Margin="0,5,0,5" />
</StackPanel>
</Grid>
As you can see, the Rectangle's width and height are binding to the parents ActualWidth and ActualHeight, respectively. This way, after layout occurs on the grid the rectangle will fill its width and height to the grids'. Now sometimes that won't work depending on how things are laid out. I will go into this in more detail in a later post, but for now try using plain old Parent.Width and Parent.Height and see if that works, such as below:
<Rectangle Width="{Binding RelativeSource={RelativeSource Self}, Path=Parent.Width}"
Height="{Binding RelativeSource={RelativeSource Self}, Path=Parent.Height}"
Fill="Black" Opacity="0.65" />
If that does not work, feel free to drop me a line and I will see if I can help you out. If you come up with any cool ways to use the opacity property or have any other comments please leave them.