0 comments

If you are building applications that could use a dashboard then I would recommend taking a look at the PacktPub book “Microsoft Silverlight 5: Building Rich Enterprise Dashboards”. The book focuses on using Silverlight 5 to construct various dashboards and provides guidelines on how to achieve this from start to finish. Along the way are useful tips and tricks and gotchas that can be found when dealing with the various aspects of building a dashboard.

Microsoft Silverlight 5: Building Rich Enterprise Dashboards

The flow of this book is a bit off. Things start off with the general “What is Silverlight 5?” and “Why should I use Silverlight for a dashboard?” questions that are answered at a high level. Reading further starts to answer what dashboards are and how to use Silverlight to build a dashboard. Next comes connecting your data to the dashboard followed by how to integrate your Silverlight dashboard into SharePoint. Going from one chapter to the next has a slight rhythm about it, but it feels disconnected most of the time as if each author took a chapter to write and in the end everything was copied and pasted into this book. One good thing about this approach is that a reader can jump between chapters and still understand what each chapter brings to the table.

The entire book covers many topics … too many topics in my opinion. The number of topics would not be discomforting if each topic delved into more detail; however, most of the topics are at a 30,000 foot level and leave the reader wanting to know more. For example, the book covers the Model View View-Model (MVVM) pattern and describes what it is and why it is a good pattern to follow using Silverlight. This is good but the chapters start to talk about specifics related to MVVM and do not provide enough detail. The delegate command is mentioned in a couple of lines with an example of how to create a delegate command but no information on how (or why) to use the delegate command. If the reader looks closely at the other examples throughout the book then one can infer how to use a delegate command but not the importance of it. There are many more topics explained in the same manner throughout this book and each of these topics really needs more detail to highlight their importance.

The crux of the book is about building dashboards using Silverlight 5 and the authors do accomplish this. There are a couple of chapters that really shine about dashboards and how Silverlight can be used to easily build a dashboard. With the majority of this book covering many topics about Silverlight the overall goal of learning how to build a dashboard is lost.

With so many topics being covered at a high level this book is not for Silverlight beginners. Having a good understanding of what Silverlight is and the features that are in Silverlight will help readers take advantage of this book. If you are new to Silverlight pay close attention to the many topics that are talked about in this book and do some research when you come across the topics to get a better idea of what that feature does and its importance.

One thing I found very distracting were the code examples. Most of them had spaces missing between words. It was very difficult to read the code to gain a better understanding of the topic at hand. This makes the code almost useless to have in the book, please get this fixed!

The book does cover many of the key aspects needed to build a great dashboard with the correct technologies in Silverlight. However, pay close attention to the various technologies that are in each chapter and do enough research to understand these technologies as they are important in constructing your dashboard. If you do you will be able to build a great dashboard using Silverlight.

To wrap things up I would recommend this book if you are interested in building a dashboard using Silverlight. Don’t expect too much from this book as a majority of the chapters focus on the basic (and advanced) building blocks of Silverlight at a high level. It is a quick read and worth your time if you are of a particular audience looking to build a dashboard in Silverlight.

2 comments

My time has been scarce and one of the reasons is due to my participation on the DeepEarth dev team. There are a handful of us that have been working hard to push out the first stable version of DeepEarth. A few of the developers have been working very hard and the work has paid off!

DeepEarth is a Silverlight mapping framework that takes full advantage of the MultiImageScale control (same control that is responsible for all the cool DeepZoom samples). DeepEarth has plenty to offer in its first release and the one thing I am super excited about is the different tile layers that are offered:

  • Virtual Earth (dev account needed)
  • Open Street Map
  • Blue Marble
  • Cloud Made
  • WMS
  • Yahoo Maps
  • Google Moon Variations

And more are on their way! Plus, you can implement your own tile layer very easily by following along the examples that are included. There is even an example for map tiles that are stored on your local machine, so no need to have an internet connection!

There is already talk of porting this to WPF, all that is missing is the MultiScaleImage control. Anyone want to take a crack at porting that control to WPF? I've heard that the control will be in .Net 4.0, but that is still some time away.

Go check out a demo here: http://deepearth.soulsolutions.com.au

And please report back any feedback to the DeepEarth project site. And feel free to contribute!

0 comments
There is a silverlight write and win contest that is currently allowing people to vote for the best article. There are some great articles there including 2 of my older posts about connecting drupal and silverlight. Be sure to read them all and vote for the one you like best! To vote, you must have silverlight installed and a nifty silverlight voting control will be displayed below the list of articles on the above link. Simply click on the article that you would like to vote for.

0 comments
Get Microsoft Silverlight

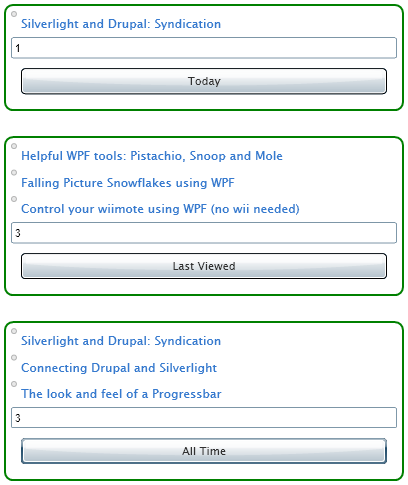
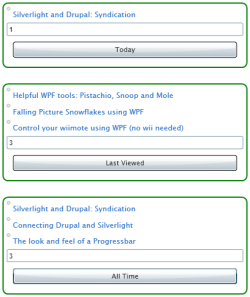
The next item in this series is the drupal popular content block. You can see this block on the right hand side titled 'Popular content' that lists my sites popular content of all time. The current block actually uses the views (version 2) module to display the content, but this information ultimately comes from drupals core statistics module. The information will be hosted in a custom silverlight control that I have created that simply sends requests to my custom drupal module and displays the data that it receives. I have broken down each part into their own section.

mattserbinskihome-thumb

Drupal Part:

The drupal side of things uses the same method that I described in my first 2 posts of this series, Connecting Drupal and Silverlight, Silverlight and Drupal: Syndication for requesting data where I map my XML-RPC methods to callback functions that send the appropriate data to my silverlight control. Drupals poplar content block has 3 pieces of popular content that I was interested in receiving data from:

  • Today's popular content
  • Last viewed content
  • All time popular content

Each of these will display a number of entries (determined by a number passed into these functions) that show their corresponding results. For example, if you request data from the all time popular content and wish to see only 3 entries, you will receive back the 3 nodes that have been viewed the most since you began your site (or since you enabled the statistics module). The data that comes back is HTML code for easy layout of links that point to these popular nodes.

For my silverlight control I needed the exact information that this module was passing back to me but in another form (to make my life easier on the silverlight side). Of course, I could use the HTML code that I was receiving, parse it correctly and end up with the same result, but I wanted to tinker with php some more. I decided to look into what the statistics module was calling using the drupal api so I could tweak those calls in my custom drupal module. The section of code in the statistic module that I was interested in is below:

$alltimetop = variable_get('statistics_block_top_all_num', 0);
if ($alltimetop && ($result = statistics_title_list('totalcount', $alltimetop)) && ($node_title_list = node_title_list($result, t('All time:'))))
   {
     $content[] = $node_title_list;
   }

This returns the well formatted HTML code that I was just describing for the all time popular content. The other 2 types of popular content (today and last viewed) have the same implementation with different variables. To alter this code some, I dove into the 'node_title_list' method and saw that this method takes in the results from the 'statistics_title_list' method and grabs out the nodes properties and then formats the string into a block  of HTML so the popular content block can be easily rendered. For my silverlight control I only needed the title of the popular content and a link to that node so I changed the php to the following:

$titles = array();
$urls = array();
$result = statistics_title_list('totalcount', $numContent);

while ($node = db_fetch_object($result))

 {
   $titles[] =  $node->title;
   $urls[] = check_url(url('node/'. $node->nid));
  }

return array('popularContentAllTimeDone', implode("~", $titles), implode("~", $urls));

I simple call the 'statistics_title_list' method that will return all of the nodes that I request ($numContent) that are in the all time popular content row in the database. I then go through each node pulling off the the title and converting that nodes nid to a valid url. I then implode each result with a special character (~) and return the method that my silverlight control will call, the titles object and the urls object. I used the implode method for easier separation of the strings that my silverlight control will receive.


Silverlight Part:

Now that we know how the data will be received in our silverlight control (and we already know how we will request data from my first post, Connecting Drupal and Silverlight) we can lay out our design. I wanted to replicate what my site already has (picture at the top-right of this post) where the popular content displays a list of hyperlinks. Ah, a list! We will use a ListBox and customize each item to look like hyperlinks and even provide an event that will take us to that node when it is selected. For each type of popular content that we will viewing, I have chosen to make 3 listboxes and have them act the same way, just request different data.

The listbox control contains a collection of items and by default displays these items in a vertical fashion (This can be changed be changing the ItemsPanel of the listbox). One great thing about the listbox is that you can bind its collection! And this is precisely what we will be doing. I set the ItemsSource={Bidning} on my listbox and this allows me to programmatically set the listboxes DataContext property in code when I receive the data I want to bind to.

I have 3 dictionaries that map a uri to a string that is populated from the data that my custom drupal module sends me. I bind my listboxes to these dictionaries, respectively and thats it, those listboxes are fully populated! Wait .... it doesn't look right, well yea, it displays 'Collection ...' instead of the node titles that we want to link to. Since the listbox, by default displays each of its items' ToString() method we get the 'Collection ...' string. We need to edit the ItemContainerStyle of the listbox so we can tell what each of its items should look like! We simply want each item to display the title that we received from drupal. This can be done with the following code (omitting my visual state groups):

<Style x:Key="styleItemContainer" TargetType="ListBoxItem">
  <Setter Property="HorizontalAlignment" Value="Left" />
  <Setter Property="Template">
    <Setter.Value>
      <ControlTemplate TargetType="ListBoxItem">
        <Grid>
          <Grid.ColumnDefinitions>
            <ColumnDefinition Width="0.1*"/>
            <ColumnDefinition/>
          </Grid.ColumnDefinitions>                   

          <!-- Circle drawing -->
          <Ellipse Width="6" Height="6" Fill="#FFE8E8E8" Stroke="#FFB5B6B6" Grid.Column="0" VerticalAlignment="Top" HorizontalAlignment="Center"/>

          <!-- Text with underline -->
          <Grid Margin="4" Grid.Column="1" HorizontalAlignment="Left">
            <Rectangle x:Name="rectangleUnderline" Stroke="#FF0062A0" Width="{TemplateBinding Width}" Height="1" RadiusX="2" RadiusY="2" VerticalAlignment="Bottom" Visibility="Collapsed" />
            <TextBlock x:Name="textBlock" Text="{Binding Key}" Foreground="#FF367ACF" />
          </Grid>
        </Grid>
      </ControlTemplate>
    </Setter.Value>
  </Setter>
</Style>

The first thing to note is the TargetType="ListBoxItem" on the style. This tells us that the style we are applying to the listboxes' ItemsContainerStyle will directly affect its items. The next thing to note is that the TextBlock has its Text property set to {Binding Key}. What does this mean? This is telling us that the text that will be displayed for each ListBoxItem is bound to some property Key. This Key property is actually the Key in our KeyValuePair Dictionary which is bound to our listboxes ItemsSource property. So for each item our listbox it will know to display the title of each node that is returned. Databinding sure is sweet!

Ok, so now our listboxes display the correct data that we want them to. All that is left is to plumb in some event that will navigate to those nodes when those items are selected. Databinding to the rescue once again! In the drupal part of this post we were returning not only the titles of each node but also the links that will take us there. This is part of the Dictionary that we set up and our listboxes are already databound to these Dictionaries, so were done! Well, just need to plumb in the event that will pull the link out of the dictionary and navigate to that page. Listbox has a 'SelectionChanged' event that will be raised whenever the selection is changed, which is perfect!

private void listBoxToday_SelectionChanged(object sender, SelectionChangedEventArgs e)
{
   Uri link = ((KeyValuePair<string, Uri>)((sender as ListBox).SelectedItem)).Value;
   HtmlPage.Window.Navigate(link);
}

The selectionChanged event grabs the listboxes selected item (which is a KeyValuePair) and pulls out the value which is our url. Then we tell the window to navigate to that link. It's that simple.

After a little styling and correctly positioning elements, here is the final result. This control allows the user to enter a number that will be returned for each poplar content. The number must be greater than 0 or else our module will return an empty string and all that will be displayed is a tiny circle (leftover residue from our item template).

SL-PopularContent-thumb

There is only 1 webClient that is being used for this control, so you must wait until the request is done processing before you make another request. Go and try the control out, it's at the top of this post and feel free to change the number for each request. One tip, press the 'Last Viewed' button, then navigate to different pages on my site and press that button again!

The source code is provided along with my custom drupal module. Remember to set the html page as the startup project if you download the source and decide to play with it.

filefile size
SLDrupal - Popular Content.rar215.47 KB
popularContentmodule.txt2.27 KB

4 comments

I will be writing a few posts on connecting silverlight and drupal in which I will replicate my main site. I will be doing this piece by piece as I investigate each drupal module that I am using and how I can request the appropriate data to populate my silverlight controls. I have outlined the basics needed to accomplish this in my previous post and will be focusing on the new information that is needed to complete each new piece.

Drupal's aggregator module is a core module that is used for fetching syndicated content from other sites. However, it has the ability to provide an xml syndication button for your drupal site if you decide to show the syndication block. There is much more functionality that this module can provide, but all I needed was a simple link to my sites syndication. After doing some initial research I did not find a way to call some method that returned my sites syndication. So I decided to 'cheat' a little bit and produce my sites syndication link manually (at least I did not hard code this!). Here is the php below:

$mainSiteRSS = variable_get('site_name', 'Drupal');
$mainSiteRSS .= url('rss.xml');
return array('rssLoaded', $mainSiteRSS);

I simply grab the sites name, append 'rss.xml' and return a correctly formatted url string to my silverlight application. I then tie that url to my rss button:

private void rssLoaded(object feedSite)
{
    string rssLocation = ((MethodToCall)feedSite).MethodName;
    Uri rssLink = new Uri("http://" + rssLocation, UriKind.RelativeOrAbsolute);
    HtmlPage.Window.Navigate(rssLink);            
}

Remember, I have a generic method that gets called when drupal returns its data that casts the data to a MethodToCall object as outlined in my previous post.

And that's it! This was one of the simpler controls and that is one reason that I decided to start with this one. The silverlight code was very simple as well; just a button that looks like the standard rss icon that was made using Expression Blend that has a click event that sends a request to drupal to return my sites syndication link, as outlined above in the php code. Here is the XAML for the rss icon:

<Button Click="rss_Click">
    <Button.Template>
        <ControlTemplate TargetType="Button">
            <Canvas>
                <Rectangle Width="50" Height="50" Fill="Orange" RadiusX="5" RadiusY="5" />
                <Canvas>
                    <Ellipse Width="10" Height="10" Fill="White" Canvas.Left="10" Canvas.Top="30" />
                    <Path Stroke="White" StrokeThickness="5" StrokeStartLineCap="Round" StrokeEndLineCap="Round" Data="M 15,20 a 15,15 90 0 1 15,15" />
                    <Path Stroke="White" StrokeThickness="5" StrokeStartLineCap="Round" StrokeEndLineCap="Round" Data="M 15,10 a 25,25 90 0 1 25,25" />
                </Canvas>
            </Canvas>
        </ControlTemplate>
    </Button.Template>
</Button>

I will post my full source code when I complete this entire replication of my site to silverlight. Until then, I will post the source for each control in a separate solution. If there is a specific drupal module that you would like converted to a silverlight control let me know and I will try to help you out!

filefile size
SLDrupal – RSS.rar141.97 KB
RSSIcon.xaml939 bytes
rssmodule.txt652 bytes